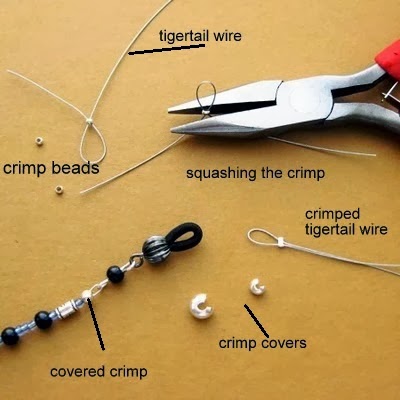
So we are (still) on the letter C in my ABC blog series (a not-so-comprehensive guide to jewellery materials and tools I use, care of your jewellery etc.) Deserving a blog post of its own, I recently separated out the subject of Crimping, a technique for finishing beaded strings. Part 2 looks at Carnelian, Chalcedony, jewellery Cleaning, Chasing hammers, Connemara marble, Cork Red marble, Copper and more.
 |
| blue chalcedony earrings |
Chalcedony is a family of quartz stones. Here comes the brief science bit so look away now if it's not your thing... Chalcedony mineral is a cryptocrystaline form of silica and is waxy in appearance. (That wasn't too painful, was it?!) This group of quartz includes Carnelian, blue chalcedony, onyx, agate and some other less common varieties such as aventurine and chyroprase.
Chalcedony has been used for decorative and practical purposes as far back as the bronze age. It was the initiation stone for Egyptian High Priests while Renaissance magicians believed it had protective qualities and, curiously, designated it their stone for health & safety. This gem is the symbol for creativity, calm, peace, well-being and banishing fear.
Chalcedony has been used for decorative and practical purposes as far back as the bronze age. It was the initiation stone for Egyptian High Priests while Renaissance magicians believed it had protective qualities and, curiously, designated it their stone for health & safety. This gem is the symbol for creativity, calm, peace, well-being and banishing fear.


Carnelian is a variety of chalcedony very popular for jewellery. It is reddish brown in colour and semi transparent in appearance. Known as the warrior stone, historically, it was incorporated into the armour of Roman soldiers. This fiery stone is associated with successful careers, passion, stamina and sporting acumen. Natural healers believe it to be a cure for nose bleeds. Carnelian is also one of the birthstones for October.
 |
| close up of a piece of Connemara marble. Own photo |
The best known, local gemstone is Connemara marble. This 600 million-year-old stone is found only in the West of Ireland. It is a very rare marble and comes in a range of greens from a white washed grey-green to darkest sage with every shade of lime and leaf in between. Many specimens are heavily variegated with several tones in one small piece. The 'serpentine streaks' are what make it so special. I am very proud to use Irish Connemara marble and also Cork red marble in my work. I have previously posted the following articles on these indigenous Irish stones if you wish to know more:
 |
| Connemara marble and copper pendant |
Connemara marble happens to go very well with another traditional Irish material, Copper. This pliable metal has been mined in Ireland for millennia. It is a durable, reddish brown metal that lends a warm look to jewellery. Copper is the symbolic gift for the 7th wedding anniversary. Said to help with inflammatory conditions, copper bracelets have long been worn by sufferers of arthritis
 |
| Turquoise jasper and pre-oxidised copper pendant |
This beautiful metal is stunning when new and shiny but I love the rustic patina copper takes on with time.


C is also for Cleaning! If you don't like the oxidised patina you can brighten natural copper with a solution of water, lemon juice and salt. A few drops of the citric juice and a few shakes of salt in a breakfast bowl half full of water is enough to brighten it up in seconds. Note: not recommended for gemstones or pearls wrapped in copper. Sea glass and other glasses are safe.

To brighten the copper wiring on the Connemara marble piece above, I would slide a sheet of plastic or kitchen shrink wrap under the wiring then dip a cotton bud into the salty lemon solution, or even just ketchup, and very carefully clean the wire. Then I would dry it with kitchen paper and dunk the whole piece into a bowl of water for a quick wash, before drying very thoroughly.
For more tips on cleaning and care of your bling please visit the Jewelry Care section of my blog.


One of my most prized jewellery tools is a Chasing hammer. This type of hammer is used with a steel block or an anvil for flattening and hardening craft wire but also for creating texture. I use a hammer on my wire charms and my own hook and eye clasps etc. Notice the bevelled texture on this silver spiral, achieved by using the smaller rounded side of the hammer head and tapping it along the wire.


Did you know C is for Fabulous...well it is when it's a fabulous Cotton Crochet Chain made by HuggleKnits - just perfect for my sea pottery and beach glass pendants. I love love love this hypoallergenic alternative to a rubber or ribbon choker as it is durable, washable, comfortable and so easy to throw on as it closes with a button. Don't you agree the dazzling blue really lifts the sea pottery pendant??
CLICK HERE FOR ALL POSTS IN THIS SERIES