Showing posts with label how to. Show all posts

Friday, July 15, 2016

How to Make Jump Rings. How to Repair Your Necklace or Chain

Has the clasp come away from your necklace or perhaps you  want  to  convert a charm into a  pendant and need a  simple  ring/bail  for  hanging it?  Whether you  are doing a bit of  DIY repair  on your  own jewellery or are a beginner in beading and wire work, learning to make jump rings is a handy skill to have. You can buy jump rings, but  if you  know how to make them yourself, you need never run short.

All you need is

*craft wire
*a round nose pliers
*a side cutter

All are available in jewellery craft stores and widely sold online.

If you are serious about wire work, a hammer and block is a recommended investment alongside a full set of pliers for jewellery making. I use a rubber tip hammer to harden jump rings, earring hooks, metal charms etc. You can also get a soldering kit to seal the rings, but a well-made, properly handled jump ring in a hard wire should stay shut with normal wear.

The wire needs to be hard enough to hold its shape. Look for the ga number or mm to find the gauge. A good, semi-hard wire for beginners is gauge 20ga (.80mm) but 18ga (1mm) is preferable and with practice, go for harder again (16ga/1.25mm). If unsure, just ask for help from your chosen supplier. If you are a novice, it's best to practice with plated wires before moving on to more expensive metals such as sterling silver. I used solid copper for these photos:


Wrap  some  wire  a few times round the base of one prong of the pliers.  The  higher  up you go,  the smaller the top jump rings will get. If you want them the same size, only make a couple at a time and wrap them on the same spot on the prong. Make a small coiled spring as shown, slide it off the pliers and cut along it at an appropriate point. 
handmade copper jump rings
I would always harden the rings using a rubber hammer and block. Click for instructions on  How to Harden Jump rings etc. Now they are ready to use for repairing your own jewellery or incorporating into your designs.  

There is a secret to opening and closing jump rings correctly so as to preserve their integrity and keep them strong and tight. Please read How to Open and Close Jump Rings...


Jump rings are the simplest way to re-attach a clasp. If you  have a soldering kit to seal them, then all the better. However, if the ring is well-made in a hard wire and opened and closed correctly, it should hold without soldering. There are other, slightly more complex ways to attach and link and I intend to post about these in future.
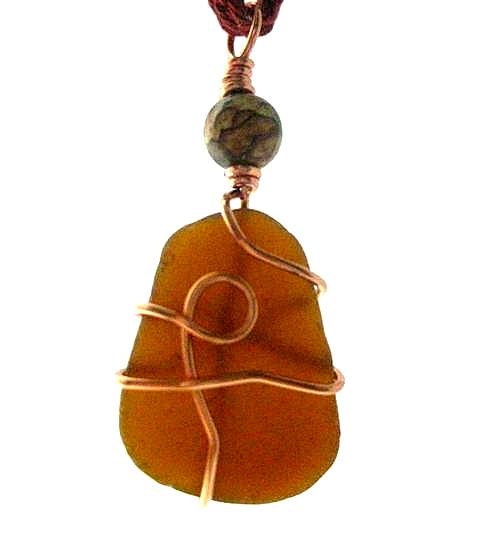
A jump ring serves as a bail to hang a charm or pendant
You can make a jump ring to attach to a small charm and wear it as a pendant, attach to a bracelet or perhaps to a zipper.


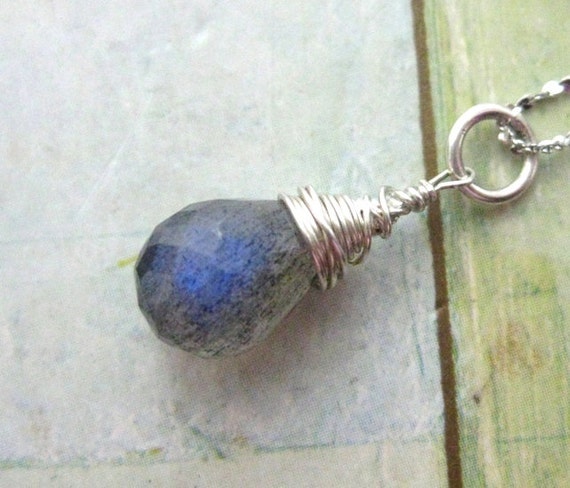
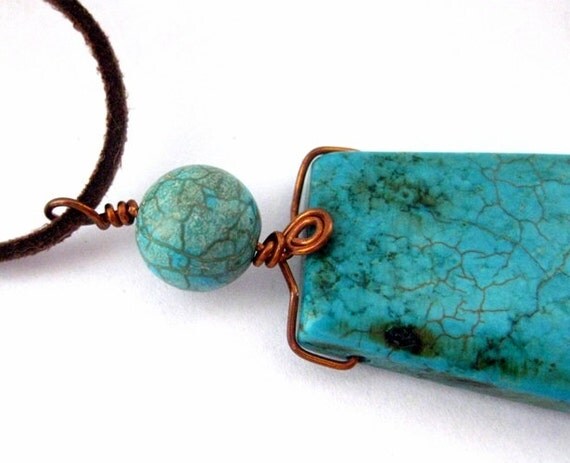
blue flash labradoirite pendant with ring bail

Sunday, June 29, 2014

Recycling Project. Candle Holder with Small Seaglass Pieces


Small pieces of colourful Irish seaglass
 What do you do with those little tiny pieces of frosted seaglass that wash up on the shore? I have a bunch of them that are way too small for wire-wrapped jewellery and ornaments. The colours are beautiful and it's a shame to waste them. Most of them are fully frosted so they have probably been tumbling in the sea for decades and it's lovely to be able to recycle them. Here's one very simple idea as to how to display them by making an eye catching candle holder.

(To learn how to clean seaglass  firstclick HERE)


As this is a recycling project, I decided to re-use this small, glass, ramekin dish that came with lemon souffle in it. (Yummy!) At just over an inch high (c28mm) and slightly more than 3 inches in diameter (c78mm), it is the perfect size for displaying a tea light candle.


First I put the small tea light in the centre of the ramakin. After placing the small seaglass around the candle, I carefully filled the dish with water, falling short of the top of the candle by about half a centimetre.
The colourful pieces of sea glass remind me a bit of those sugary, jelly sweets small kids love.
The fluted design of the dish throws gorgeous patterns of light. The candlelight picks up some soft colour from the seaglass in the water. Three of them would make great centre pieces along a table. Only two lemon souffles in a pack...I'd best go and get some more so.

To learn how to clean seaglass click HERE
To learn how to clean seaglass jewellery click HERE


Friday, June 6, 2014

F is for Findings

Welcome to part 2 of the letter F in my ABC of Jewellery. The series is a not-so-comprehensive guide to jewellery, materials and techniques I use, inspirations and design. The letter F proved to cover quite a lot, so I divided it into two posts. Part 1 covered Fluorite, Feldspar, Fan necklaces and Fairies. Part 2 introduces you to the group of craft supplies called Findings. It so happens, I have a small bank of previous posts to help me here.
examples of jewellery findings
Findings are those little components used in jewellery making to connect, secure, enhance or hang either the other components (beads/stones etc) or the entire piece. Examples include earring hooks, charms and clasps but they encompass a long list of other small supplies from headpins to crimps and are mostly made of metal. All good jewellery craft suppliers will sell a wide range and the larger online suppliers often have clear explanations for usage.

If you have some experience in wire work, you can make many findings yourself quite easily from craft wire. I took a findings master class at Dublin store, Beads & Bling a few years ago, but you can find tutorials online. I include links in this article to any relevant tutorials I have written to date myself.
         

The simplest of findings is the humble jump ring. This is a basic ring of wire that can be open or soldered shut. If you are not a jewellery maker you can use an open jump ring for repairs such as re-attaching a clasp if you know the correct technique to ensure the ring closes tightly. I previously posted this insider tip How to open Jump rings & Loops You don't have to own a pliers to do this if you have a strong tweezers.

If you do have the basic tools, you can even make your own jump rings with a hard craft wire, such as gauge .80mm (20ga) or 1mm (18ga) and, when adept, in super hard 1.25mm (16ga). I don't do this often, as I prefer to wire wrap links instead but I do make the odd ring to use as a hanging bail for a pendant.


For full instructions on making jump rings please refer to my recent post How to Make Jump Rings...

There are several ways to finish a beaded string but my method of choice is to use metal crimps and covers. I previously wrote a tutorial on How to Use Crimps  which may be of use to beginner beaders or of interest to those who have only ever used knotting techniques.
tiger eye pendant with spiral charm detail

Small metal charms can also be classified as findings. These are tiny pendant-like motifs that you can attach   onto  extender   chains,  charm  bracelets,  flat stones  and  to  other  findings  for decorative purposes.


A typically Irish symbol that only requires the same basic pliers set and wire to make is the Celtic spiral. For instructions please refer to my previous post How to Make Spiral Charm. 


It is preferable to hammer most of your handmade findings and charms to make them strong and rigid. Again, here's one I made earlier: How to Harden Charms and Findings with a Rubber Hammer. A chasing hammer (middle photo) can also add texture.


Other basic tools required if making your own findings are a set of metal files for softening sharp ends of wire and an agate burnisher for finishing the job by smoothing. A burnisher is also useful for polishing and for smoothing little nicks and bumps in metal.

F is also for Friday...so have a good one and a fun filled weekend!

***

CLICK HERE FOR THE ABC SERIES SO FAR

or by letter:
A  B  C  (plus C for Crimping D E F


Sunday, June 16, 2013

Blooms Day Costume Ideas & Tea Dying Lace

Happy Blooms Day! It's June 16th. Visitors to Dublin who are not in the know may think we've gone a little mad or perhaps they're stepping in and out of a strange time warp. All over the city this week they bump into flamboyant, Edwardian characters discoursing in pubs, cycling around on rickety old bicycles, bursting into prose or song, and getting up to all sorts of shenanigans. Blooms Day is celebrated every year around this date to commemorate James Joyce and his most famous work, Ulysses, set on 16th June, 1904. And the fun is not confined to Dublin; the Blooms Day bug has spread far and wide with festivals taking place around the world this year.
You don't have to be a fan of Joyce or have read Ulysses to join in the fun. In fact, if it introduces you to this great Irish writer for the first time,  all the better.
Edwardian dress, National Museum, Collins Barracks. Own photo.
File:Spencer-sisters.jpg
Edwardian Day Wear courtesy of Wikimedia Commons
Anyone can become Edwardian for a day, don a costume, hired or of their own making (much more fun) and be more than just a spectator. 

Ladies have fun raiding your grannies' wardrobes and the charity shops for high-necked, lacy blouses, full skirts and fashion yourself a bustle if you can. If you are going for a more working girl style, no bustle needed. Think Mary Poppins or My Fair Lady.  Ankle or pixie boots will work really well. You'll even get away with last winter's shoe boots with the little kitten heels. Roll your hair up in a loose updo, with plenty of volume at the front.
File:Irish immigrants 1909.jpg
courtesy of Wikimedia Commons
Gentlemen, go seek out waistcoats, braces, rounded wire rim glasses, a straw boater or fedora hat or failing that, a flat cap will do, fob watches, Dickie bows or cravats. You will find most of what you need in the city's charity shops if you take a little time to look. If you really want to go for it, how about an eccentric, curly moustache from a joke shop or costume hire outlet? You can of course, draw yourself a big handlebar using eyeliner...though I would not recommend pinching your girlfriend's makeup without permission. For a finishing touch, carry a curly pipe or simply a newspaper under your arm.
Here I am back in 1904... oh ok, it was a few years back but not that long ago when I made this costume for Bloomsday. The blouse was a high necked, 1980s blouse from a charity shop, where I also picked up the hat with the feather on the band. The skirt is a simple long black A-line that I found in my mother's attic. But I fashioned the shawl out of an old lace kitchen curtain, dyed with tea.  I sewed on a gilt chain clasp to close it.

HOW TO AGE LACE WITH TEA DYING
This method is not recommended for valuable, vintage lace or lace that you want to last for decades. The acidic tannin in tea may shorten the life of the lace.

* If the lace is new do wash it first for its initial shrinkage.
*Don latex or rubber gloves to avoid staining hands
*Boil about 10 tea bags (black tea) in a stainless steel pot on the stove. Avoid aluminium pots.
(Alternatively you can make several pots of strong tea and pour into a plastic basin, which you will need to clean with bleach later to remove staining.)
*Stir the tea with a wooden spoon and gently squeeze the bags to release more dye. 
*If any bags burst you will need to strain the liquid.
*Remove the bags and let the tea cool
*Immerse wet lace into the cooled tea, stir gently and flatten at intervals to get the dye to take evenly
*When happy with the intensity of the shade, rinse the fabric and plunge into a basin of cold water with a dash of vinnegar. This will make it more colourfast.
*Dry flat
Cute Bookmark Hook. Beaded with Candy Red Stone. Silver Plated Squiggle Hook.
BEADED BOOKMARK
Lookind for ideas for 1940s costumes? Click here
Lookind for ideas for 1960s costumes? Click here


Thursday, October 25, 2012

Sea Glass and Copper Wire

Seaglass & Copper Pendant. Rich Autumnal Reddish Brown. Irish Beach Glass.  Sunset in Dublin
Copper has been used in Irish jewellery for centuries. It is a reddish, brown metal that is a pleasure to work with and beautiful to wear.

Natural copper wire lends a warmer look than silver, and tends to scratch less easily than plated wire when working with it. It is pliable for wire wrapping, yet strong and sturdy, perfect for encasing seaglass. I love it whether it's shiny and red, or whether it has garnered a darker, more rustic patina with time.

I've just listed this russet-brown seaglass pendant on Etsy. I found the frosted glass on a beach in Dublin. The rich, autumnal colour works really well with the warmth of the copper wire.

Right now the metal is bright and shiny. It will slowly gain a darker patina. This is a natural occurrence known as oxidation.


Long Turquoise Stone Pendant Copper Wrapped. Adjustable Necklace. Blue and Brown. Temptress
This turquoise stone pendant is wrapped in pre-oxidised copper wire. It has a more rustic or vintage feel to it.

Brightening untreated copper is actually fairly easy to do. Beware of trying this on lacquered copper or so-called 'Vintaj' copper or similar. Lacquered copper will never really tarnish, it just gets grimy. All it needs is a wash in soapy water. 'Vintag' or 'Antiqued' copper is a cheaper alloy metal and will not brighten properly.


However, natural copper that has oxidised over time can be brightened with a lemon and salt solution.  Just pour a couple of inches of water into a non-metallic bowl. Add a few drops of lemon, enough to lightly cloud the solution, and a few decent shakes of salt. Dip or soak your natural copper and watch how quickly the patina is lifted off.
salt and lemon solution will brighten natural copper
This method is safe for sea glass and other glass but not recommended for gemstone, pearls or amber. It is safe for sheet copper jewellery that is un-coated.

Copper bookmarks. Oxidised on the left, cleaned with lemon and salt in water on the right.


How to Clean Silver
How to Clean Seaglass and Sea Pottery
How to Care for Seaglass Jewellery

Sunday, September 23, 2012

How to Tie Adjustable Slip Knots

This weekend I was explaining to a friend how to tie an adjustable slip knot to hang a pendant and remembered I had posted a tutorial on it for the Etsy Ireland blog about two years ago. So I thought I'd redo the post here on my own blog:  This tutorial is a little hard to photo so I hope it's easy to follow.

This is a really simple project, easy enough for those of you who can't bead or wont bead and just want to hang a pendant, ID badge or charm. You can also apply this technique to make a bracelet.

First get a long piece of chord. I find that leather, suedette or waxed cotton tend to work best. Ribbon isn't great. You need something that has grip yet will allow the knot to slide. It needs to be long enough to fit over your head + 8 inches. About 32 inches is a decent, workable length if you are medium to plus sized. Some may need a shorter piece, or longer piece. Whatever works for you.
Hang your pendant or charm in the middle of the chord before tying the necklace. Place the two loose ends of the chord flat on the table as pictured then fold one end over the other as shown. 
 

 Now bring the loose end of the folded piece away from you, back under the other strands. Then wrap it back over the top of the strands, towards you again.


 Repeat this two or three times, wrapping the chord over itself, working towards the bend in the loop you've created (to the left in these photos.)
On the final wrap, bring the short loose end through the loop as in the photo.  (For simplicity's sake I have only wrapped a couple of times here, but an extra wrap would be more secure.)
Pull that short end through the loop, (to the left) while at the same time pulling the longer strand on the far side of the knot in the opposite direction. (Do it slowly to check you are pulling the correct two pieces! If the knot isn't tightening and only moves, then you are tugging the wrong long strand.) The knot should be tightening and look like this.
 

You should end up with something like this. Now tie the other side to create a second knot. Just mirror what you just did, working to the right this time. Then tighten that knot too.


Tada! Two knots that you can slide away from each other to shorten the chord once it is over your head and slide towards each other to lengthen.
You can trim the loose ends close to the knot, leaving a small piece free to ensure the knot's stability. Depending on what material you have used, you may seal the end to prevent fraying using clear nail varnish, a drop of glue or in the case of leatherette, by carefully singing it. (Caution!!! And not to be carried out by children). Do not get glue or varnish onto the knot itself or it wont slide.
I hung this turquoise blue stone and copper pendant, 'Temptress,' on a long length of brown suedette using this technique.