Showing posts with label handy tip. Show all posts

Friday, July 15, 2016

How to Make Jump Rings. How to Repair Your Necklace or Chain

Has the clasp come away from your necklace or perhaps you  want  to  convert a charm into a  pendant and need a  simple  ring/bail  for  hanging it?  Whether you  are doing a bit of  DIY repair  on your  own jewellery or are a beginner in beading and wire work, learning to make jump rings is a handy skill to have. You can buy jump rings, but  if you  know how to make them yourself, you need never run short.

All you need is

*craft wire
*a round nose pliers
*a side cutter

All are available in jewellery craft stores and widely sold online.

If you are serious about wire work, a hammer and block is a recommended investment alongside a full set of pliers for jewellery making. I use a rubber tip hammer to harden jump rings, earring hooks, metal charms etc. You can also get a soldering kit to seal the rings, but a well-made, properly handled jump ring in a hard wire should stay shut with normal wear.

The wire needs to be hard enough to hold its shape. Look for the ga number or mm to find the gauge. A good, semi-hard wire for beginners is gauge 20ga (.80mm) but 18ga (1mm) is preferable and with practice, go for harder again (16ga/1.25mm). If unsure, just ask for help from your chosen supplier. If you are a novice, it's best to practice with plated wires before moving on to more expensive metals such as sterling silver. I used solid copper for these photos:


Wrap  some  wire  a few times round the base of one prong of the pliers.  The  higher  up you go,  the smaller the top jump rings will get. If you want them the same size, only make a couple at a time and wrap them on the same spot on the prong. Make a small coiled spring as shown, slide it off the pliers and cut along it at an appropriate point. 
handmade copper jump rings
I would always harden the rings using a rubber hammer and block. Click for instructions on  How to Harden Jump rings etc. Now they are ready to use for repairing your own jewellery or incorporating into your designs.  

There is a secret to opening and closing jump rings correctly so as to preserve their integrity and keep them strong and tight. Please read How to Open and Close Jump Rings...


Jump rings are the simplest way to re-attach a clasp. If you  have a soldering kit to seal them, then all the better. However, if the ring is well-made in a hard wire and opened and closed correctly, it should hold without soldering. There are other, slightly more complex ways to attach and link and I intend to post about these in future.
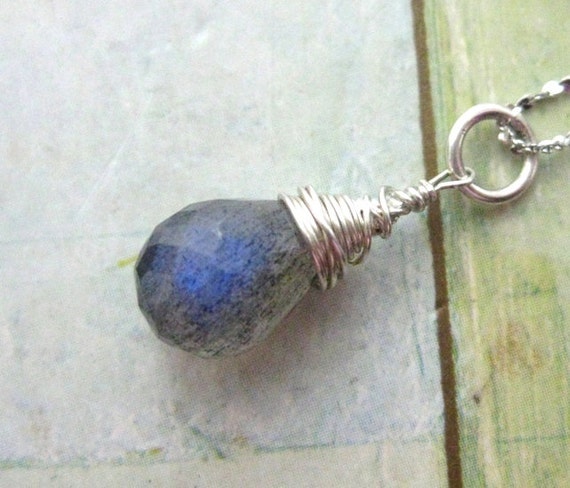
A jump ring serves as a bail to hang a charm or pendant
You can make a jump ring to attach to a small charm and wear it as a pendant, attach to a bracelet or perhaps to a zipper.


blue flash labradoirite pendant with ring bail

Thursday, July 24, 2014

Drying Herbs

dried mint leaves
Drying herbs the old fashioned way is the easiest thing in the world. All you need to do is to make a bundle, tie twine or thread around the stems and hang the upside down somewhere warm and dry. When we were kids, my mum used to tie all sorts of herbs and flowers and hang them in the attic under the eaves.
big bunch of mint drying
Last week a friend gave me an enormous bunch of mint. Yes, I know it looks like bundle of weeds, but if only we could photograph smells, you'd be yearning for a mojito right now! When drying herbs, I hang them on cute pink hooks off the side of the freezer, where it is nice and warm. In this Summer weather they dry super quickly.
Here's some I dried earlier in the year. I store the aromatic leaves in larger mason jars to keep the moisture out. They make fabulous, digestive tea. Pop 2 or 3 into a mug, add water that has gone off the boil and leave to infuse for a few minutes.
rosemary ice cube
If you have nowhere suitable to dry herbs, or don't like the look of them hanging up, you can freeze them instead. To learn how, please refer to my older post 'Herby Ice Cubes.'

Sunday, June 29, 2014

Recycling Project. Candle Holder with Small Seaglass Pieces


Small pieces of colourful Irish seaglass
 What do you do with those little tiny pieces of frosted seaglass that wash up on the shore? I have a bunch of them that are way too small for wire-wrapped jewellery and ornaments. The colours are beautiful and it's a shame to waste them. Most of them are fully frosted so they have probably been tumbling in the sea for decades and it's lovely to be able to recycle them. Here's one very simple idea as to how to display them by making an eye catching candle holder.

(To learn how to clean seaglass  firstclick HERE)


As this is a recycling project, I decided to re-use this small, glass, ramekin dish that came with lemon souffle in it. (Yummy!) At just over an inch high (c28mm) and slightly more than 3 inches in diameter (c78mm), it is the perfect size for displaying a tea light candle.


First I put the small tea light in the centre of the ramakin. After placing the small seaglass around the candle, I carefully filled the dish with water, falling short of the top of the candle by about half a centimetre.
The colourful pieces of sea glass remind me a bit of those sugary, jelly sweets small kids love.
The fluted design of the dish throws gorgeous patterns of light. The candlelight picks up some soft colour from the seaglass in the water. Three of them would make great centre pieces along a table. Only two lemon souffles in a pack...I'd best go and get some more so.

To learn how to clean seaglass click HERE
To learn how to clean seaglass jewellery click HERE


Sunday, June 15, 2014

Keep Your Earrings Together.

Earrings can be a bit like socks. Pairs have a sneaky habit of parting company, so you end up with a bunch of useless odd ones. Seriously, where do the other ones go?
own earrings, not for sale
 Here is a great tip for keeping your stud earrings together in the jewellery box when travelling or simply for pretty display purposes.

Button down the hatches cos these babies aren't getting away! Just pin them through the holes of a button to keep them from splitting up. If you are travelling, I'd then wrap them in a bit of thick paper tissue or  perhaps some felt.
keeping earrings together with a button
Fastening the studs through a button is also a lovely way to display your stud earrings on your dressing table! You could even try joining a few buttons together to make a cute decoration.
button hook for displaying earrings
I did a quick little experiment and threw together this button hook with some pink craft wire. It's not for sale, I was just playing around with the idea, but you see where I'm going with it.

The bottom button serves as a holder for dangle earrings too. If you don't work with craft wire, you could try this at home with thick thread or chord perhaps. Why not give it a go and see what works?


Thursday, February 27, 2014

C is for Crimping. How to Finish a Beaded Necklace

The letter C in my ABC series brings me to the subject of crimping and a whole lot more: Connemara marble, Cork red marble, copper, chalcedony, carnelian, chasing hammers... So much in fact, that I decided to separate out the technique of crimping into a blog post of its own.

Crimping is a secure and professional way to finish off beaded jewellery in lieu of knotting. Personally, I would use a knot only if beading with elastic for a stretchy bracelet, but with  tigertail (nylon coated steel beading wire) for me, it's crimping all the way. 


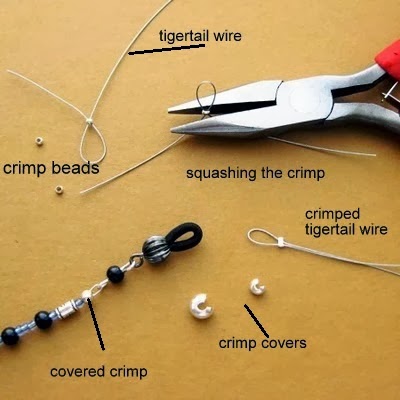
Crimps are tiny metal beads which you thread onto the ends of a beaded string and crush flat to hold the beads in place. They cling to wire holding it fast. I prefer this method over knotting as it is durable and quite simply, I'm better at it and more able to get in really close to the last bead for a smooth finish. It also eliminates any possible need for using glue. Glue and me often come to a sticky end. You can get a special crimping tool to help but I use the traditional flat nose pliers for crushing and employ crimp covers for a neat finish.


beaded eyeglass chain finished with crimps & wire guards
Crimp covers are fold-over metal beads that give a sleeker, safer finish. Crimp covers come in a range of metals, precious included. For extra durability I often double crimp, especially in a big or heavier necklace and for bracelets, which can get rougher treatment as the wearer goes about their daily business. 


Double crimping is unusual, but it is one of the features of my hand work that makes it extra special. Here is how I finished this big statement necklace for a custom order:


For a heavy necklace like this I also use two strands of tigertail for extra strength. I began by making the beaded link to the clasp, then looped the string onto it. Next I threaded on the first crimp about 1mm from the end and crushed it flat. You have to be careful not to let the wires cross over inside the bead or it will be weak.


The next stage is to grip a suitably sized  crimp cover and place the crushed crimp into its 'mouth' then gently fold it closed with the pliers. Sterling silver covers are quite soft and easy to squish out of shape so this is a delicate operation. 


Very light tapping and squeezing gets the cover properly lined up and sealed smoothly. Most beaders do not double crimp but I like to as the second crimp takes some of the weight off the first one. I usually separate out the crimps with a bead that matches the piece, so making them part of the design. 
The stones and beads go on next and the trickiest part is finishing the strand. Bead your crimp(s) on but don't crush yet. For this heavy necklace I used two lengths of tigertail and both strands would be doubled back to pass through the crimps again, so extra wide crimps were required.
Loop the tigertail onto the clasp (wire guards may be used if desired. See photo of blue eyeglass leash at top of article). Double back to thread through the crimps and the first 2 or 3 beads. Make sure to trim the wire to such a length that it will hide inside a bead. I've done this bit super loosely just for the photo before pulling it tight.


Once the wire is tucked away and beads are in position, only then are the crimps crushed and covered.
Onyx & oxidised silver necklace (custom OOAK order)
See how the covered crimps are now part of the design? The double string and double crimping makes this big necklace extra strong.


*** *** ***
Watch this space for part 2 of the letter C 
Click HERE to see all posts in the ABC series

Friday, October 25, 2013

How to make a Wire Spiral Charm

This is the second article showing a glimpse at how I work. Last Friday I showed how to temper or harden wire with a rubber hammer.  Today I'd like to show how to make a wire spiral charm.
modern Celtic street art, Dublin city
Spirals, triskeles and concentric circles are among the oldest design motifs known to us. They are found in ancient artwork in diverse corners of the world, and are intrinsically associated with the Celts in particular. Famously, they are a key feature seen at the megalithic tombs of Newgrange, Ireland. Over 5000 years old, the burial chambers predate the pyramids of Egypt and Stonehenge in the UK.

Born and bred in Ireland and proud of our rich heritage, I like to use the spiral frequently in my jewelry. Making spiral charms is a simple pleasure and here is how it's done:

You need some jewelry wire or plated craft wire, a round nose pliers, a flat nose or chain nose pliers and side cutters. Unless using fairly hard wire (eg. 16g), I would usually also temper, or harden, the charm with a rubber hammer and steel block.
  

Grip the wire as close as you can get to the end using the tips of the round nose pliers. If the edge of the wire is jagged, nip it cleanly with the side cutter. In one smooth movement, roll the wire back on itself, towards your body to create the centre of the spiral. There are other techniques I use to format the centre, e.g., a looser, wider circle or tighter wire work with no centre hole at all, but this is an nice easy one to start with. I also chose to use a medium-sized centre loop here as I am later going to widen and bevel the charm with a special finish.
  

Gently but firmly grip the loop you've created with the chain nose or flat nose pliers so that half of the loop is in the jaws and the wire is pointing up and out as shown. Careful not to squeeze too hard or you will squish or dent the wire.
  

With your free hand pull the wire down towards the floor in one smooth movement while still holding the loop in the same starter position. With practice you will do this quicker, enabling a cleaner curve. Shift the work around so the wire is again near the top and pull the wire down again to create the next section of curve. 
      

Repeat these two movements again until you have created a 3 'banded' spiral. Grip the loose end of the wire with the round nose pliers, close to the end of the jaws but not with the tips this time. In one smooth movement, curve the end back over itself towards the spiral using the curve of the jaws to guide the shape.

Temper (harden) the charm with a rubber hammer. (For instructions please click HERE)

    
I mentioned at the start that I was going to widen this charm and give it a special finish. I used the flat head of a chasing hammer to flatten and spread the wire.This action moved the centre loop closer to the next band for a cleaner look. I then bevelled the charm by tapping all the way around it using the ball head of the chasing hammer. 

This silver plated charm also got further texturing when I distressed it with a file to let some copper come through the silver. But that is an other episode in its journey, to be told another day....

*** *** ***


To see how to open jump rings the correct way, CLICK HERE. (Also of interest for non-jewelry artists for simple repair works!)

Click HERE for general handy tips from tea-dying lace to making herby ice cubes.